


Traction Splint: The Operator’s Guide to Femur Fracture Management
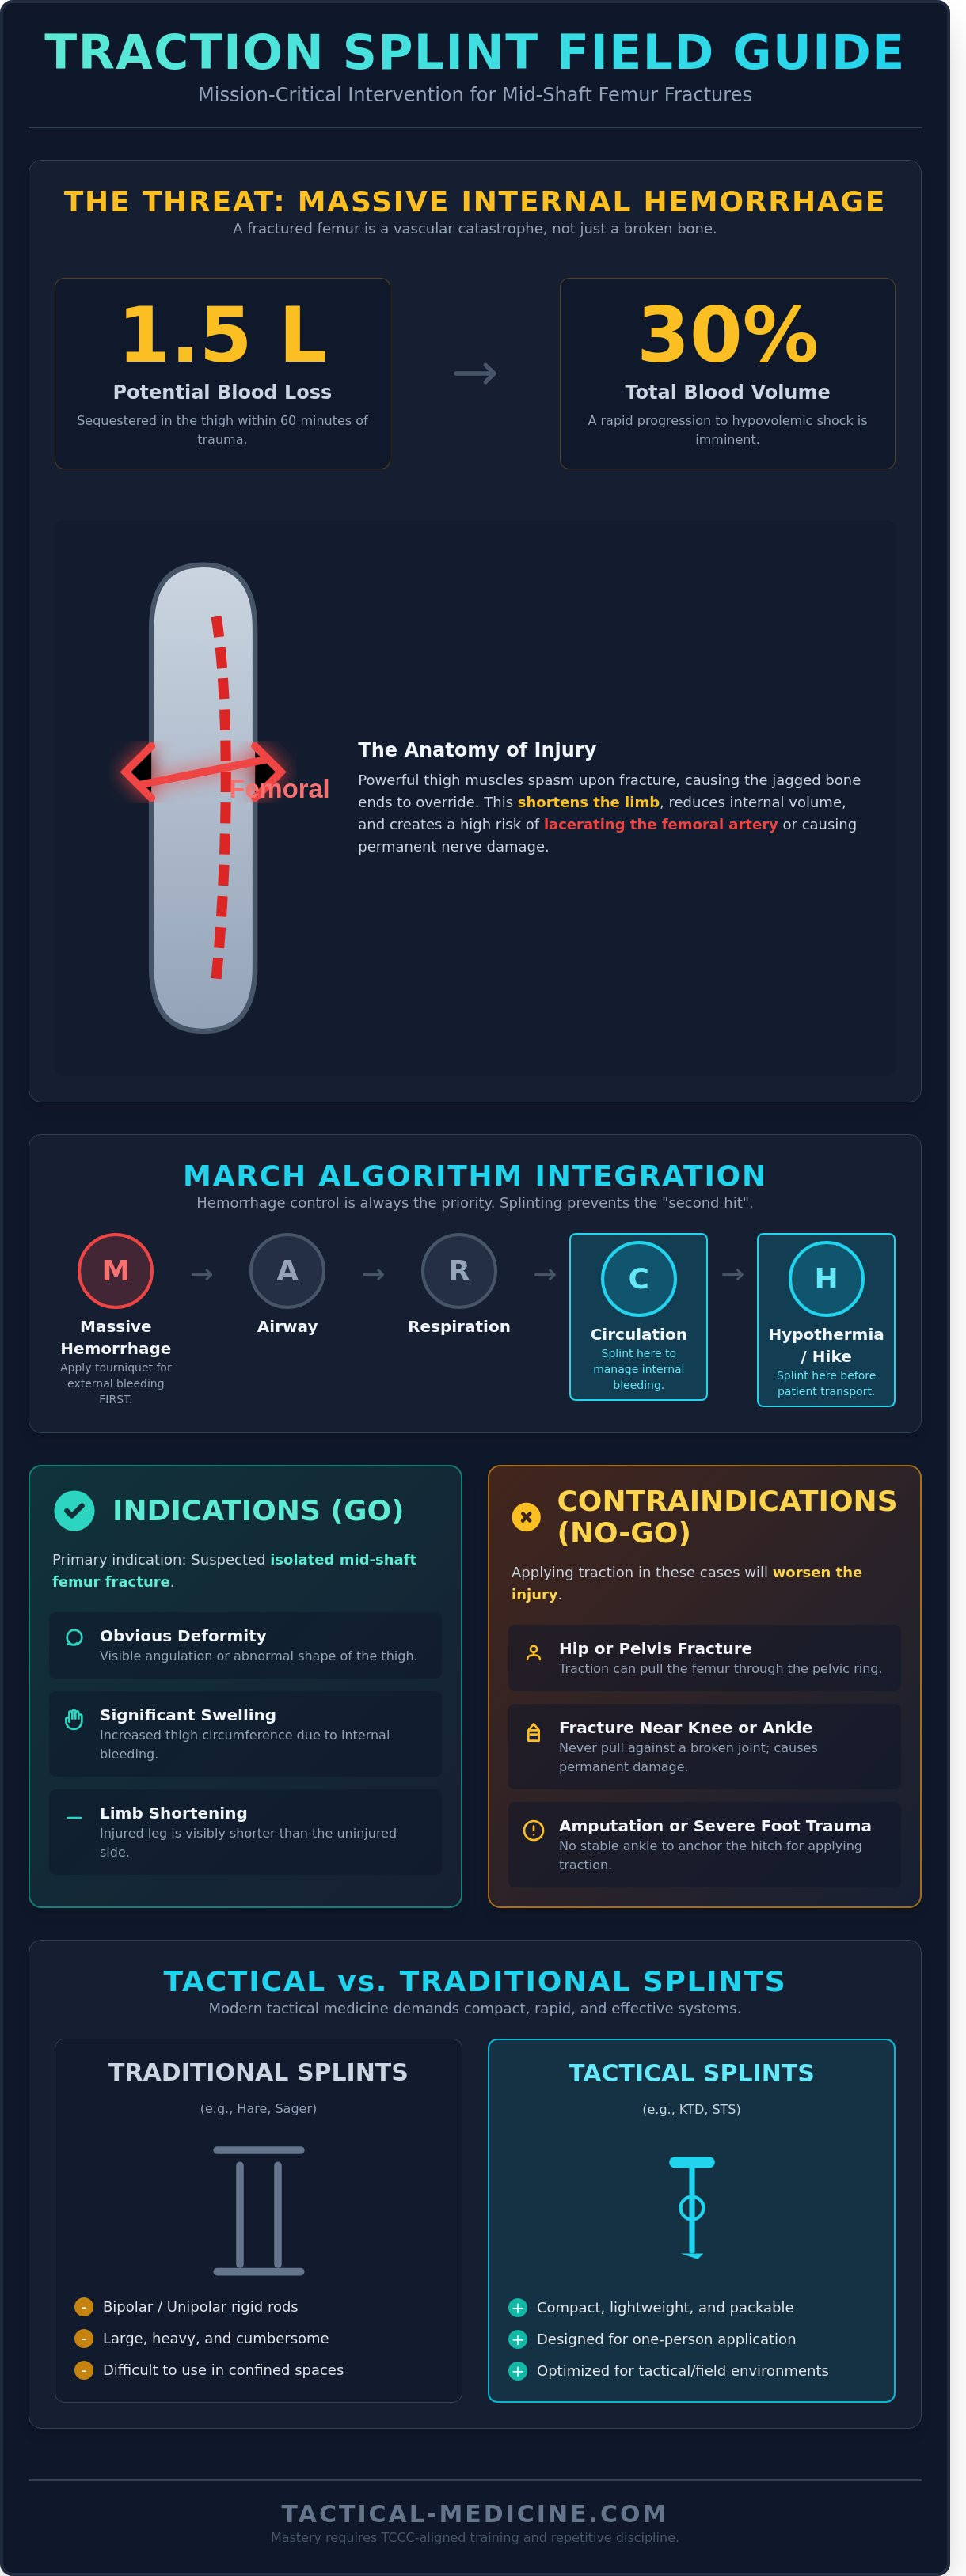
A mid-shaft femur fracture can sequester up to 1.5 liters of blood in the surrounding soft tissue within 60 minutes of the initial trauma. In a high-threat environment, this injury isn't merely an orthopedic concern; it's a life-threatening internal hemorrhage that directly challenges your MARCH algorithm priorities. You recognize that fumbling with complex hardware during a casualty evacuation increases the risk of shock and permanent neurovascular damage. Deploying a traction splint is a critical intervention that demands clinical precision and tactical speed.
You've likely faced the dilemma of balancing limited space in a mission-specific medical bag against the need for rugged, dependable equipment. This guide provides the expertise you need to master the indications, selection, and field application of modern splinting systems. We'll analyze TCCC-aligned protocols, offer a step-by-step proficiency breakdown for one-man application, and identify the field-proven devices that ensure your patient survives the flight or the drive to the next level of care.
Key Takeaways
- Identify the life-threatening hemorrhage risks associated with mid-shaft femur fractures and why immediate stabilization is non-negotiable.
- Evaluate the critical differences between bipolar, unipolar, and tactical traction splint designs to ensure your loadout matches your operational environment.
- Master the visual cues for deployment and learn to recognize contraindications that could compromise patient outcomes in high-stress scenarios.
- Follow a standardized field protocol for limb realignment, focusing on neurovascular integrity and manual stabilization techniques.
- Bridge the gap between equipment ownership and operational proficiency through TCCC-aligned training and repetitive discipline.
What is a Traction Splint and Why is it Mission-Critical?
A traction splint is a mechanical stabilization device designed to realign mid-shaft femur fractures. In tactical medicine, this tool is mission-critical. A fractured femur isn't just an orthopedic injury; it's a potential vascular catastrophe. Internal blood loss into the thigh compartment often reaches 1 to 1.5 liters within minutes of the injury. This volume loss represents nearly 30% of a patient's total blood volume and can quickly lead to hypovolemic shock. The device applies constant longitudinal traction to counteract the body's natural response to trauma. It's a standard component of advanced tactical medical kits because it stabilizes the limb and manages internal space during prolonged field care.
The Anatomy of a Femur Fracture
The femur is the largest bone in the human body. It's surrounded by powerful muscle groups that contract immediately upon fracture. This contraction causes a "thigh-shortening" effect where the jagged ends of the bone override each other. The femoral artery lies in close proximity to the bone shaft. Sharp fragments can easily lacerate this artery or damage the femoral nerve. Immobilization is mandatory. By restoring the limb's length, the traction splint reduces the internal volume of the thigh. This mechanical tension helps tamponade internal bleeding and prevents further soft tissue destruction during rugged transport over uneven terrain.
Traction Splints in the MARCH Algorithm
Operators must integrate splinting into the MARCH (Massive Hemorrhage, Airway, Respiration, Circulation, Hypothermia) algorithm correctly. Splinting typically occurs during the "C" (Circulation) phase or the "H" (Hike/Evacuation) phase. You've got to distinguish between immediate life-threats and secondary stabilization. If the fracture is open and bleeding profusely, apply a tourniquet during the "M" phase. Hemorrhage control always precedes the application of a traction splint. Once the site is secure, use the splint to prevent the "second hit" of injury caused by movement during extraction. Proper application according to CoTCCC standards ensures the casualty remains stable for the duration of the medevac. It's about maintaining the patient's physiological status until they reach a higher level of care.
Indications and Contraindications: When to Deploy Traction
The primary indication for a traction splint is a suspected isolated mid-shaft femur fracture. You'll recognize this injury through several distinct visual cues:
- Obvious deformity or angulation of the thigh.
- Significant swelling and increased circumference of the injured leg.
- Visible shortening of the limb compared to the uninjured side.
These fractures are high-energy injuries. The quadriceps and hamstrings will spasm, pulling jagged bone ends into the surrounding muscle and vasculature. Applying traction isn't just about stabilization; it's critical pain management. By restoring limb length, you neutralize the muscle spasms that cause excruciating agony and internal hemorrhage. Clinical data from pre-hospital trauma studies shows that stabilizing the femur early reduces the risk of fat embolism and systemic shock.
Adhere to the clinical imperative: splint them where they lie. Movement without stabilization risks converting a closed fracture into an open one or severing the femoral artery. Every millimeter of bone movement increases the risk of permanent nerve damage.
Absolute Contraindications
Don't apply the device if you suspect a fracture of the hip or pelvis. Traction will pull the proximal femur through the pelvic ring, worsening the injury. Avoid use if the fracture is within the distal or proximal third of the bone, near the knee or ankle. The rule is simple: don't pull against a broken joint. Joint distraction leads to permanent ligamentous and neurological damage.
Relative Contraindications and Tactical Realities
Assess for lower leg amputations or severe foot trauma. Without a stable ankle to anchor the hitch, standard traction is impossible. Per CoTCCC guidelines, don't apply a traction splint during Care Under Fire. Transition to splinting during Tactical Field Care. For evacuations exceeding 240 minutes, monitor neurovascular status every 30 minutes. Operators must maintain proficiency with field-proven medical gear to ensure rapid deployment under stress.
Tactical vs. Traditional Traction Splints: A Comparison
The Hare Traction Splint represents the traditional bipolar design. It utilizes two rigid rods to provide stability but creates a footprint too large for modern mobile operations. The Sager unipolar splint improved this by using a single rod, yet it remains cumbersome in confined spaces. Tactical medicine requires a departure from these legacy systems. Operators now prioritize the Kendrick Traction Device (KTD) and the Slishman Traction Splint (STS) for field deployments.
The "proximal hitch" defines the tactical advantage. Legacy splints extend 8 to 12 inches beyond the patient's foot. This extension prevents the closure of ambulance doors and hinders patient loading in helicopters like the UH-60. The STS solves this by keeping all mechanical components proximal to the foot. This design choice ensures the patient fits within the standard litter dimensions, maintaining a streamlined profile during technical extractions.
- Hare (Bipolar): Heavy, requires significant storage, and extends beyond the foot.
- Sager (Unipolar): Allows for bilateral splinting but remains bulky for ruck carry.
- KTD: Ultra-lightweight at 20 ounces, uses folding poles similar to tent stakes.
- STS: Features a distal point of pull that stays within the patient's footprint.
The Evolution of Compact Design
Traditional Hare splints occupy nearly 500 cubic inches of space. This volume is unacceptable for a medic carrying a standard 3-day assault pack. Tactical variants utilize telescoping aluminum or carbon fiber rods to collapse into a package smaller than a standard IV bag. These materials provide the necessary 15 pounds of traction without the weight penalty. Most modern units are radiolucent. This allows the surgical team to perform initial X-rays without removing the traction splint, preventing secondary vascular injury during hospital handover.
Application Speed and Operator Fatigue
Standard protocols for legacy splints often require two providers. One medic maintains manual traction while the second secures the straps. In a high-threat environment, manpower is a luxury. The STS allows a single operator to apply the device in under 60 seconds. It uses a mechanical tensioning system that provides immediate relief to the patient. Mechanical ratchets are superior to elastic tension systems because they do not lose "creep" or stretch during long-range transport. You can evaluate these Tactical Medical Gear options to ensure your kit meets current TCCC standards for femur stabilization.
How to Apply a Traction Splint: Step-by-Step Field Protocol
Applying a traction splint is a high-stakes intervention that demands technical proficiency. You've got to move with speed while maintaining clinical precision to avoid exacerbating the injury. Follow this five-step protocol to stabilize mid-shaft femur fractures in high-threat environments.
- Step 1: Neurovascular Assessment. Perform a distal Pulse, Motor, and Sensory (PMS) check. Document the presence of a pedal pulse and the patient's ability to feel stimuli. This baseline is critical for identifying vascular compromise during transport.
- Step 2: Manual Traction. An assistant must apply steady, manual traction to the limb. This action overcomes the powerful spasms of the quadriceps and hamstrings. These muscles pull bone fragments into a painful override that can cause massive internal bleeding.
- Step 3: Secure Straps. Position the splint under the injured leg. Secure the proximal ischial strap firmly against the pelvic bone. Attach the distal ankle hitch; ensure it's snug but doesn't cut off circulation.
- Step 4: Mechanical Traction. Engage the mechanical tensioning device. Gradually increase the pull until the limb is stabilized or the patient reports significant pain relief.
- Step 5: Final Security and Re-assessment. Secure the remaining support straps to prevent lateral movement. Re-check PMS immediately. If pulses are lost, ease the tension slightly and reassess the limb's position.
Achieving the Correct Amount of Tension
Precision in tensioning prevents secondary trauma. Use the standard rule of thumb: apply traction equal to 10% of the patient’s total body weight. Do not exceed 15 lbs of force. The primary goal is the relief of muscle spasms and the restoration of limb length. Don't over-pull. Excessive traction can lead to skin necrosis or permanent nerve damage. Monitor the patient’s face; the reduction of pain is your most reliable indicator of success.
Managing the Splint During Transport
The mission doesn't end once the traction splint is on. During tactical evacuation, equipment can shift. Re-check the ankle hitch and ischial strap every 15 minutes or after any significant patient movement. Ensure the splint’s frame doesn't interfere with litter straps or prevent the closure of aircraft or vehicle doors. Document the exact time of application and any changes in distal perfusion on the TCCC casualty card. Detailed logging ensures the receiving surgical team understands the patient's vascular history.
Training and Equipment Readiness for the Tactical Medic
High-end hardware fails in the hands of an untrained operator. A traction splint isn't a "plug and play" device; it's a precision tool that requires muscle memory developed through thousands of repetitions. Tactical Combat Casualty Care (TCCC) and Tactical Emergency Casualty Care (TECC) guidelines emphasize that interventions must be performed under high cognitive load. MED-TAC International Corp. selects equipment based on a 98% reliability rating in combat conditions. You can't afford to read instructions for the first time while your patient is in hypovolemic shock. Discipline in training ensures that when the adrenaline spikes, your hands move with clinical precision.
Conduct kit audits every 30 days without exception. Nylon straps degrade when exposed to UV radiation or extreme temperatures. Check the tensioning mechanisms on your traction splint to ensure they haven't seized or become clogged with debris. If a component shows fraying or structural cracks, replace it immediately. Reliability is the only metric that matters when you're 20 miles from the nearest Level 1 trauma center.
- Standardize your loadout: Ensure every team member uses the same model to allow for cross-compatibility.
- Force-on-force drills: Practice application while wearing full kit and gas masks.
- Environmental stress: Train in low-light and cold-weather environments to identify gear limitations.
Integrating Splints into Your IFAK or Medic Bag
Space is a premium in a standard IFAK. Fold your compact splints to fit the internal dimensions of your medic bag's secondary compartment. Place them behind the MARCH-specific modules for rapid access during the "Tactical Field Care" phase. Standardized components allow for faster turnover during a MIST report. In improvised scenarios, splint rods can serve as structural support for litters or temporary limb stabilization. Choosing battle-proven, standardized components over custom medical kits ensures that any medic on the stack can use your gear effectively.
Next Steps: Certification and Procurement
Mastery comes from veteran-led instruction. These instructors bring 15 or more years of operational experience to the classroom. They teach you how to handle complications that technical manuals ignore, such as applying a traction splint on a patient with multiple limb injuries. Practice doesn't make perfect; perfect practice makes permanent. Enroll in a TCCC training course to bridge the gap between theory and survival. Once your skills are sharp, equip your team with the best traction splints and medical gear to ensure mission success and operator survival.
Secure the Fracture and Maintain the Mission
Managing a mid-shaft femur fracture in high-threat environments demands more than basic medical knowledge; it requires disciplined adherence to TCCC protocols. A properly deployed traction splint stabilizes the fracture site, reduces potential internal hemorrhage, and mitigates the risk of fat embolisms during long-range transport. You've learned that selecting a compact, tactical-grade device is essential for maintaining operator mobility without sacrificing clinical efficacy. Every second counts when a patient's femur is displaced. Since 2004, MED-TAC has operated as a veteran-owned and operated resource for professionals who prioritize mission success over marketing fluff. We're an authorized distributor of CoTCCC-recommended equipment and a leading provider of professional TCCC and TECC certifications. Our gear is battle-proven and built to function under extreme physiological stress. Don't let equipment failure or lack of training dictate the outcome of a life-saving intervention. Equip yourself with hardware designed for the rigors of the field.
Browse Field-Proven Traction Splints at MED-TAC
Your commitment to mastering these interventions saves lives. Stay focused, stay prepared, and keep your skills sharp for the next mission.
Frequently Asked Questions
Can I apply a traction splint if the patient has a suspected pelvic fracture?
No, you shouldn't apply a traction splint if a pelvic fracture is suspected. The pelvis serves as the anchor point; applying force to a compromised pelvic ring can increase internal volume and exacerbate hemorrhage. CoTCCC guidelines prioritize the use of a pelvic binder over femoral traction when multi-system trauma suggests a 10% or higher probability of pelvic instability.
How much traction should I apply to a fractured femur?
Apply traction equal to 10% of the patient's body weight, not to exceed a total of 15 pounds (6.8 kg). The goal is to stabilize the fracture and reduce muscle spasms that cause bone fragments to overlap. Stop tensioning once the injured limb's length matches the unaffected side or when the patient experiences a reduction in pain. Over-tensioning risks neurovascular compromise.
What is the difference between a unipolar and bipolar traction splint?
The primary difference lies in the frame design; a unipolar splint uses a single rod while a bipolar splint uses two. Unipolar devices like the Sager are positioned medially, making them effective for bilateral femur fractures. Bipolar devices like the Hare splint provide a more rigid external frame but are generally heavier, weighing approximately 5 pounds compared to the 2-pound compact unipolar models.
Is a traction splint used for open (compound) femur fractures?
Yes, use a traction splint for open femur fractures if the wound is at the mid-shaft. Realigning the femur reduces the risk of the jagged bone ends severing the femoral artery, which can lead to exsanguination in under 3 minutes. Always clean the site and apply a sterile dressing before the bone retracts into the thigh during the tensioning process.
How long can a traction splint remain on a patient during evacuation?
A traction splint can remain in place for 4 to 12 hours during tactical evacuations. You must perform a neurovascular check every 20 minutes to ensure the ankle hitch hasn't compromised distal blood flow. If you're operating in a prolonged field care environment, reassess the tension after any significant temperature change or altitude shift during air transport.
Can one person apply a Slishman Traction Splint (STS) alone?
Yes, the Slishman Traction Splint (STS) is specifically designed for solo application in under 60 seconds. Its unique design doesn't require a second person to maintain manual traction while the straps are secured. This allows a lone operator to manage the fracture while simultaneously monitoring the patient's airway and breathing, which is critical in high-threat environments.
What happens if I over-tighten the traction on a patient?
Over-tightening the device leads to pressure necrosis and permanent nerve damage within 2 hours of application. If the tension exceeds 15 pounds, you risk causing a compartment syndrome-like effect in the lower leg. Watch for the 5 Ps: pain, pallor, pulselessness, paresthesia, and paralysis. If distal pulses disappear, you must immediately reduce the tension until the pulse returns.
Are traction splints included in a standard IFAK?
No, traction splints are not part of a standard 1-pound Individual First Aid Kit (IFAK). They're specialized tools usually found in vehicle-based trauma kits or a platoon medic's aid bag. While an IFAK contains a 36-inch SAM splint for general immobilization, the mechanical components required for femoral traction are too bulky for a standard belt-mounted pouch.
Leave a comment