


Tourniquet Application Techniques: The Tactical Medic’s Guide (2026)
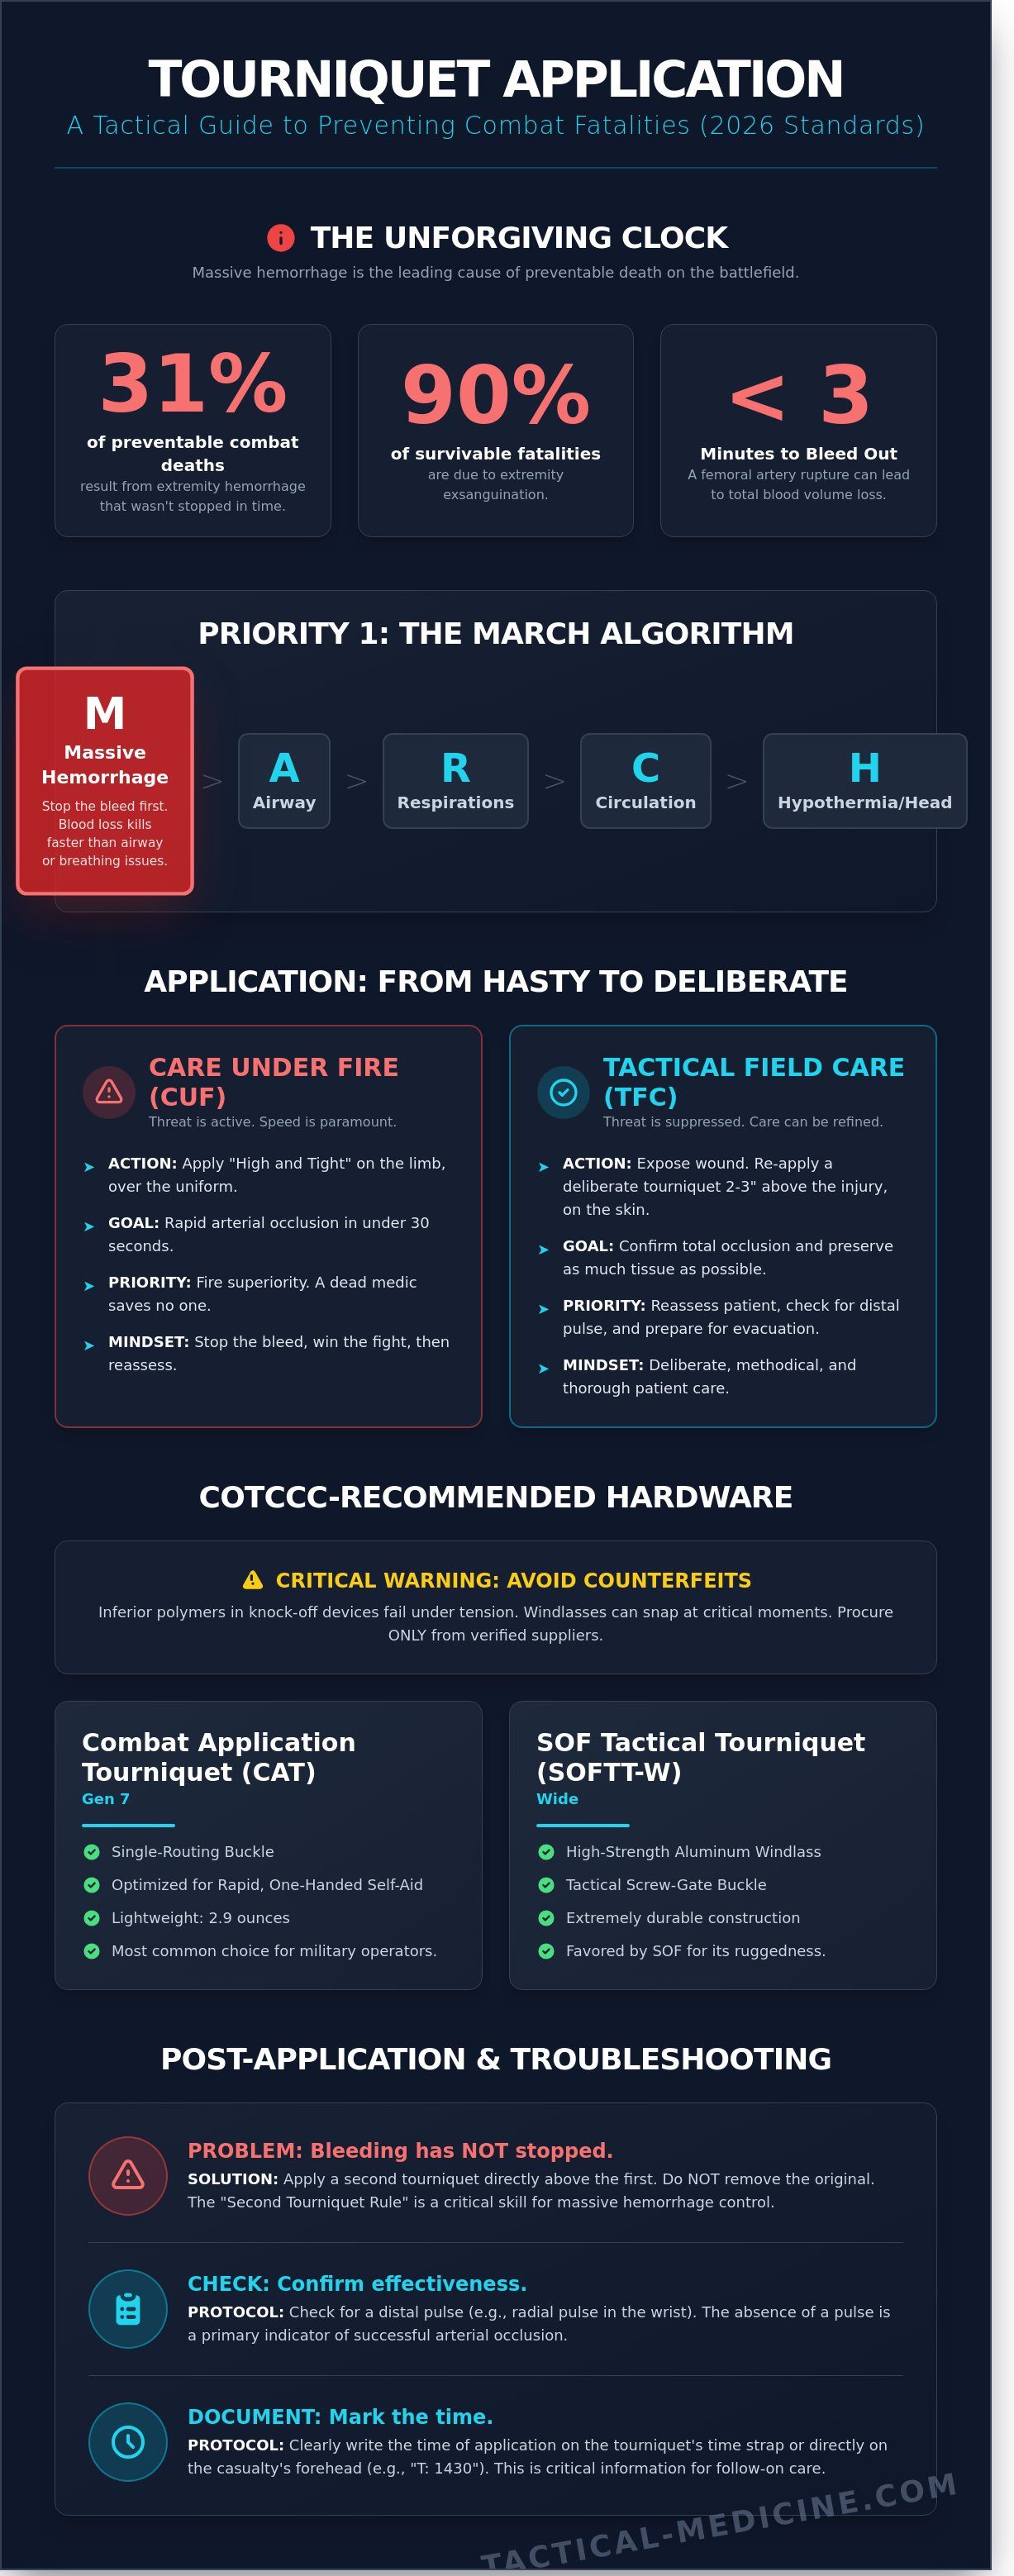
In high-threat environments, historical data confirms that 31% of preventable combat deaths result from extremity hemorrhage that wasn't mitigated in time. You understand that when a femoral artery is compromised, you don't have the luxury of second-guessing your gear or your training. This guide focuses on the critical tourniquet application techniques necessary to achieve rapid arterial occlusion as of 2026, ensuring every second serves the survival of the operator.
It's common to feel the weight of responsibility when performing a life-saving intervention under a high cognitive load. You've likely felt the pressure of choosing between competing protocols or the fear of a windlass snapping during a critical moment. We'll replace that uncertainty with the technical mastery required by the latest CoTCCC guidelines. You'll gain the confidence to select rugged, field-proven equipment and the skill to perform one-handed self-application under stress. We're providing a methodical breakdown of the MARCH algorithm's most vital step, transforming your field response into a series of deliberate, practiced actions.
Key Takeaways
- Identify CoTCCC-recommended hardware to ensure your equipment is battle-proven and capable of achieving total arterial occlusion under stress.
- Master specialized tourniquet application techniques for both one-handed and two-handed deployment to maintain proficiency during self-aid or buddy-aid.
- Execute the standardized protocol for transitioning from a "hasty" placement high on the limb to a deliberate, skin-surface application as the tactical environment evolves.
- Learn critical troubleshooting skills for massive hemorrhage, including the "second tourniquet" rule and protocols for monitoring casualty stability during transport.
Hemorrhage Control: Why Tourniquet Proficiency is Mission Critical
Massive hemorrhage remains the leading cause of preventable death on the battlefield. Data from the US Army Institute of Surgical Research indicates that extremity exsanguination accounts for approximately 90% of potentially survivable combat fatalities. A Tourniquet is a dedicated mechanical device engineered to achieve total arterial occlusion. It isn't a tool of last resort; it's a primary intervention. When a major artery is severed, the physiological window for survival is measured in seconds. A casualty can lose their entire blood volume in less than three minutes.
The Committee on Tactical Combat Casualty Care (CoTCCC) prioritizes hemorrhage control through the MARCH algorithm. Massive hemorrhage is the 'M' in this sequence because blood loss kills faster than airway or respiratory issues. Mastering tourniquet application techniques ensures that the medic can transition from identifying a threat to stabilizing a limb in under 30 seconds. This proficiency separates successful outcomes from preventable losses in high-stress environments.
The Anatomy of Arterial Bleeding
Identifying life-threatening bleeding is the first step in the tactical medical assessment. Non-life-threatening trauma, such as minor venous oozing or abrasions, doesn't require a tourniquet. You must focus on the 'Kill Zone' where large vessels like the femoral and brachial arteries reside. A complete femoral artery rupture can lead to unconsciousness in 60 seconds due to rapid hypovolemia. Arterial occlusion is the complete cessation of blood flow via external circumferential pressure. This pressure must exceed the systolic blood pressure to be effective.
Tactical Priority: The Care Under Fire (CUF) Phase
Care Under Fire represents the most volatile phase of an engagement. The primary goal is to neutralize the threat and prevent further casualties. Medical care is strictly limited to the rapid application of a limb tourniquet for life-threatening bleeding. During CUF, the standard is 'High and Tight' placement over the uniform. This protocol eliminates the time-consuming need to expose the wound while under active fire. You must balance fire superiority with medical intervention; a dead medic can't save anyone. Once the threat is suppressed or the casualty is moved to Tactical Field Care, you can refine your tourniquet application techniques by reassessing the placement and checking for a distal pulse.
- CUF Priority: Rapid limb occlusion and fire superiority.
- TFC Priority: Wound exposure, reassessment, and potential TQ conversion.
- Standard: Application in under 30 seconds, one-handed or two-handed.
Selecting the Right Hardware: CoTCCC-Recommended Tourniquets
Selecting the correct hardware is the first step in successful life-saving intervention. Your skill level doesn't matter if the windlass snaps during the second turn. Counterfeit devices, often sold on unregulated marketplaces, look identical to genuine hardware but use inferior polymers that fail under tension. Reports from 2024 indicated that some knock-off windlasses failed at just 120 pounds of pressure. This is unacceptable in the field. MED-TAC maintains a strict procurement policy, stocking only CoTCCC-Recommended Tourniquets proven in high-intensity combat operations. These devices undergo rigorous clinical trials to ensure they provide 360-degree circumferential occlusion without mechanical failure.
The windlass mechanism is the industry standard for a reason. It provides the mechanical advantage necessary to compress the femoral or brachial artery against the bone. By converting rotational force into linear tension, the windlass allows the operator to reach the high pressures required for occlusion. Other tightening systems, such as ratchets or elastic bands, often struggle with "bulk" or "skin pinch," which can lead to incomplete hemorrhage control. You must integrate these tools into your tourniquet application techniques to ensure the bleeding stops on the first attempt.
CAT vs. SOFTT-W: Tactical Hardware Comparison
The Combat Application Tourniquet (CAT) Gen 7 is the primary choice for many operators due to its single-routing buckle. This design allows for rapid, one-handed application, weighing only 2.9 ounces. It's built for speed. Conversely, the Special Operations Forces Tactical Tourniquet (SOFTT-W) features a high-strength aluminum windlass and a tactical screw-gate buckle. While it weighs slightly more at 3.7 ounces, its durability is unmatched in environments with heavy debris or mud. The SOFTT-W buckle allows you to apply the device without sliding it over a foot or hand, which is vital for trapped limbs.
The Myth of the Improvised Tourniquet
Data from the Journal of Trauma and Acute Care Surgery shows that improvised tourniquets have a failure rate exceeding 60 percent. Belts, rags, and paracord lack the width and mechanical advantage to stop arterial flow. An average adult thigh requires 250 to 350 mmHg of pressure to achieve occlusion. Most improvised solutions rarely exceed 120 mmHg. Instead of stopping the bleed, they often create a venous tourniquet. This prevents blood from returning to the heart while allowing the artery to continue pumping, which actually increases blood loss. Relying on makeshift gear creates unnecessary legal and clinical risks for the medic.
Accessibility determines survival. Don't bury your hardware at the bottom of a pack. Keep a dedicated, marked tourniquet in your IFAK where it can be reached with either hand. Review our professional-grade IFAK components to ensure your gear matches your training. Effective tourniquet application techniques depend on having the right tool ready the moment the threat is neutralized.
One-Handed vs. Two-Handed Application Techniques
Tactical success depends on the operator's ability to adapt to their own injuries or those of a teammate. The distinction between one-handed and two-handed tourniquet application techniques is not just theoretical; it determines survival in the high-stress window of the MARCH algorithm. Staging your equipment is the first step toward a successful outcome. A tourniquet stored in its original factory plastic is a liability. It must be staged in a "flat-fold" or "loop" configuration to allow for immediate deployment when one arm is incapacitated. Failure to stage correctly increases application time by an average of 25 percent, a delay that often proves fatal in massive hemorrhage scenarios.
Self-Application: The One-Handed Technique
Self-application to an upper extremity requires precise motor skills under extreme physiological stress. Route the band around the limb and through the buckle using only your functional hand. You must pull the strap as tight as possible before engaging the windlass. Eliminating slack is the most critical step. If you can fit two fingers under the band after the initial pull, it is too loose. Many operators resort to the teeth-assist method to gain leverage, using their incisors to hold the tail while the hand pulls the buckle tight. While CoTCCC guidelines prioritize manual dexterity, this method remains a viable last resort when grip strength fails. For those focused on improving tourniquet application, practicing this under simulated darkness or with wet hands is essential to identify mechanical failure points before they occur in the field.
Buddy-Aid: The Two-Handed Technique
Applying a device to a casualty allows for maximum leverage and bilateral control. When performing buddy-aid, standard CoTCCC protocol dictates placing the device "high and tight" over clothing during the Care Under Fire (CUF) phase. Once you transition to Tactical Field Care (TFC), you should perform a deliberate reassessment. This involves placing a second tourniquet 2-3 inches above the wound directly on the skin if the situation allows. Communication is vital during this process. Tell the casualty "this is going to be painful" to manage their expectations and prevent them from fighting the intervention. Mechanical errors often occur when the operator fails to lock the windlass securely in the clip or neglects to document the time of application on the TQ strap. Reference our Professional Selection Standards for 2026 to ensure your hardware is rated for these high-tension loads. Consistent training ensures these tourniquet application techniques become muscle memory, reducing the risk of catastrophic slip-ups during a kinetic engagement.
- Slack Management: Ensure the band is tight enough to stop venous flow before the first windlass turn.
- Windlass Security: Confirm the rod is locked into the clip and the security strap is Velcroed across the top.
- Pulse Check: Always verify the absence of a distal pulse to confirm total arterial occlusion.
Step-by-Step Protocol: From Hasty to Deliberate Application
Once the immediate threat is suppressed and you move to Tactical Field Care (TFC), you must transition to a deliberate application. This involves exposing the injury site to identify the exact source of bleeding. Place the tourniquet 2 to 3 inches above the wound, directly on the skin. This precision reduces unnecessary tissue damage and ensures maximum arterial occlusion. If you cannot identify the exact source due to multiple injuries, stick with the high and tight placement until a more thorough assessment is possible.
The Application Algorithm
- Step 1: Route the strap through the buckle and position the device. Ensure the windlass is easily accessible for your dominant hand. If it's a leg application, you'll typically use a two-handed technique to ensure maximum leverage.
- Step 2: Pull the strap as tight as possible before you ever touch the windlass. You shouldn't be able to fit more than three fingers under the band. Slack is the primary cause of tourniquet failure in over 50% of field applications recorded in recent combat data.
- Step 3: Twist the windlass until the bleeding stops. You must verify success by confirming the absence of a distal pulse. If the pulse remains, the pressure is insufficient. A second tourniquet applied side-by-side is often necessary for large or muscular thighs.
Security and Documentation
Lock the windlass firmly into the clip or tri-ring. This prevents the device from loosening during patient transport or high-stress movements. Secure the remaining strap over the windlass to prevent snagging on gear, litters, or vegetation during evacuation. You're then required to document the application time on the "T" or "Time" label.
Clinical data from 2023 TCCC guidelines indicates that accurate time-stamping reduces the risk of ischemic injury when surgeons evaluate the limb at Role 2 or Role 3 facilities. This documentation is a critical component of the casualty card protocol. It ensures the surgical team knows exactly how long the limb has been without blood flow. If you're operating in a high-intensity environment, you can also mark the time on the patient’s forehead using a permanent marker. To ensure your kit is ready for these high-stakes moments, invest in professional medical equipment that meets CoTCCC standards.
Post-Application Care and Tactical Troubleshooting
Securing the device is only the start of the intervention. You must monitor the casualty constantly during transport. Movement on a litter or inside a cramped vehicle often shifts the device, leading to renewed hemorrhage. If blood begins to soak the dressing or a distal pulse returns, don't hesitate. Re-tighten the windlass or apply a second tourniquet proximal to the first. This side-by-side technique is a standard requirement for large limbs where a single device often fails to achieve complete arterial occlusion. Field reports indicate that up to 20% of femoral arterial bleeds require a second TQ to stop the flow. For a deeper look at integrated wound care, see our Definitive Guide to Hemorrhage Management.
Pain is an expected outcome of effective tourniquet application techniques. A functioning device causes intense, localized agony. This is a clinical indicator of success; if the patient isn't complaining of discomfort, the TQ is likely too loose. Manage this through the MARCH protocol, utilizing fentanyl or ketamine as tactical conditions allow. Never loosen the device to provide comfort. Your priority is life over limb.
Tourniquet Conversion and Removal
The 2-hour window is your primary benchmark for reassessment. CoTCCC guidelines state that conversion to a pressure dressing should be attempted if transport to a surgical facility exceeds 120 minutes, provided the casualty isn't in shock. Only qualified medical personnel should attempt removal. Improper release can trigger a bolus of metabolic toxins, potentially leading to cardiac arrest. While compartment syndrome is a risk after 4 to 6 hours of ischemia, the immediate threat remains exsanguination. Survival always takes precedence over potential tissue loss.
Training and Readiness
Mastery requires high-stress repetition. You must train as you fight by refining your tourniquet application techniques in low-light, cold, and high-noise environments. Gear maintenance is equally vital for mission success. UV exposure and extreme heat degrade the synthetic fibers of your TQ. Replace any device that has been exposed to direct sunlight or temperatures above 120 degrees Fahrenheit for extended periods. Your life depends on the integrity of your hardware.
Mastering the Standard of Care
Mastering tourniquet application techniques isn't optional for those operating in high-threat environments. True proficiency starts with selecting CoTCCC-recommended hardware and extends to the muscle memory required for one-handed application under fire. You've learned to transition from a high-and-tight hasty application to a deliberate one, positioned 2 to 3 inches above the wound, once the tactical situation stabilizes. Since 2004, MED-TAC has provided the veteran-led expertise and field-proven gear necessary for these critical interventions. As an authorized distributor for North American Rescue and Tactical Medical Solutions, we supply the same rugged tools used by SOF, SWAT, and EMS professionals worldwide. Your gear is a direct extension of your skill; ensure it's dependable when the MARCH algorithm dictates immediate action. Don't settle for unproven hardware when lives are on the line. Proper maintenance and staging of your CAT or SOFTT-W can make the difference in those first 30 seconds of a massive hemorrhage. Equip your mission with CoTCCC-recommended tourniquets from MED-TAC and carry the confidence that comes from battle-proven reliability. You've got the training; now carry the tools to match your commitment.
Frequently Asked Questions
How long can a tourniquet stay on before causing permanent damage?
A tourniquet can remain in place for up to 120 minutes without causing permanent nerve or muscle damage. CoTCCC guidelines indicate that risks of limb loss increase significantly after the 6-hour mark. If your evacuation time exceeds 2 hours, you must assess the wound for potential tourniquet conversion to a pressure dressing. Always document the application time on the device to ensure receiving surgeons have accurate data for clinical decisions.
Is it better to place a tourniquet high and tight or 2 inches above the wound?
Use the high and tight method during the Care Under Fire phase when you can't identify the exact wound site due to clothing or darkness. Transition to placing the device 2 to 3 inches above the wound during the Tactical Field Care phase. Proper tourniquet application techniques require direct skin contact when possible to prevent slipping. This 3-inch gap ensures you're proximal to the arterial rupture while preserving maximum joint function.
Can you use a tourniquet on a child or person with small limbs?
You can use a standard CoTCCC-recommended tourniquet on children or individuals with small limbs. Research from 2019 confirms that the CAT Gen 7 effectively occludes blood flow on circumferences as small as 13 centimeters. Ensure the strap is pulled completely tight before engaging the windlass to eliminate any slack. If the limb is too small for a mechanical device, apply direct manual pressure or a hemostatic dressing.
What should I do if the bleeding doesn't stop after applying one tourniquet?
Apply a second tourniquet side-by-side and proximal to the first if bleeding persists after maximum windlass tension. Data from battlefield trauma registries shows that 25% of femoral arterial injuries require two devices to achieve full occlusion. Don't remove the initial device; it's already providing partial pressure. Position the second tourniquet directly touching the first to create a wider compression band against the bone.
Should I ever loosen a tourniquet to 'let the limb breathe'?
Never loosen a tourniquet once it's set to control life-threatening hemorrhage. Periodic loosening releases accumulated toxins and metabolic waste into the bloodstream, which can cause cardiac arrest or organ failure. This practice also allows the wound to resume profuse bleeding, potentially leading to hypovolemic shock. Only a qualified medical provider should attempt to convert or remove the device under controlled clinical conditions or TCCC protocols.
Do tourniquets work on neck or torso wounds?
Standard windlass tourniquets don't work on the neck, groin, or axilla. These areas require junctional tourniquets or aggressive wound packing with hemostatic gauze like QuikClot. For torso wounds, use occlusive dressings for open chest injuries or direct pressure for abdominal bleeds. Statistics show 20% of preventable battlefield deaths occur from non-compressible junctional hemorrhages that standard limb tourniquets cannot reach.
How can I tell the difference between a real CAT tourniquet and a fake one?
Identify a genuine Combat Application Tourniquet by checking for the CAT brand embossed on the windlass and a single-routing buckle. Counterfeit devices often fail at 150 pounds of pressure, whereas authentic Gen 7 units withstand significantly higher torque. Look for the manufacturer's name, North American Rescue, on the back of the base plate. Buy only from authorized distributors to avoid the 30% failure rate associated with knock-off equipment.
Can I reuse a tourniquet after it has been applied in a training scenario?
Don't reuse a tourniquet for operational duty after it's been used in a training scenario. Repeatedly tightening the windlass stretches the internal band and weakens the hook-and-loop material, which compromises the integrity of your tourniquet application techniques. Dedicate specific devices for practice and mark them clearly with a blue trainer indicator. A device used in 10 training cycles has a much higher probability of snapping during a real-world MARCH intervention.
Leave a comment